
Author: Mert SUBAŞIAY, System Test Engineer – Avionics Software Group

This post is about basic test algorithms for complex hardware that contains RAMs, flashes, bootloaders and processors and I will try to briefly explain the purpose, working and testing principles of them.
First of all, to test the hardware, processors and other parts, brand and item specific datasheets need to be found. Architecture of the processor should be learnt from it with minimum misunderstanding. Hardware parts, capabilities and handicaps need to be known by tester. The tests may vary according to brand but most of them shares similar algorithms so any of these can be applied with minor changes.
1. Hardware Parts and Tests
To test the hardware, the equipment working theory should be known and learnt first. Because tester needs to understand why it’s not working. Some devices might have item specific test cases so datasheets need to be checked before start testing. These are just algorithms so all necessary connections should be done before testing.
1.1. Processor
First of all processor needs to be verified to see if it is working properly. A simple “hello world” code should be enough for starting. If it’s not working and if you are sure about your code, try it with another processor.
If it’s not working too, then there may be a mistake in code. This can happen a lot so check your test code. Some register blocks such as “system configuration registers” may be secured by a lock mechanism. To unlock them key words might needed to be written in specific registers.
If the code works on the other processor then there should be a problem in the hardware. Check the connections and try again. If it’s not working contact with hardware designer.
This process can be done for every test to understand if the problem is caused by software or hardware. All the process can be watched by a debugger step by step.
After some arithmetic tests try to control the outputs and inputs with a simple LED circuit. Some processors have pin multiplexers in them so always check it out before starting. If there is a pin multiplexer find the right multiplexer value, register address and set it.
Also you may need to set the pin direction if it’s an input or output. Find “direction address” and set it according to test.
1.2. RAM
RAM is the main working memory of a processor. Processor is using these memories during working and storing data in case of usage. Also code and functions are running and stored in these memories. They are fast and have high energy consumption. RAMs lose their data if the power is off (NVRAMs don’t lose data).
RAMs are consist of registers. Register is a place for a word of data storage. All registers have an address and a value. You may need some coding done before access those registers or a FPGA may do the work for it or your processor already have some interface to make it easier.

After checking inputs and outputs try to communicate with RAM. To do this both RAM and processor datasheets are needed. From the processor part, external memory interface registers needs to be found and set according to RAM datasheet. After settings are completed RAM registers should be reachable from processor specific chipset.
According to chipset, RAM addresses has an origin (offset). Also there should be a maximum length for each chipset. This value defines maximum address value and maximum memory can be attached to that chipset.
For example if origin address is 0x00200000, first RAM address is 0x00200000. If length is 0x00010000, last address of the RAM is 0x0020FFFF. This means that you can attach maximum 64 Kbytes RAM to this chipset.
1.2.1. Address Bus Check
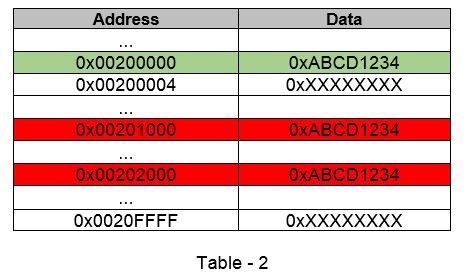
First address bus needs to be checked. Because if there is a short circuit in address peripheral, data needs to be written in an address also can be written another address. As you guess this can cause a lot of problems.
To check this, first clear all addresses. After that write the data in a specific address then check other address if they are clear or not. If they are not clear and has same data in it, as shown in Table 2, then address bus has a short circuit. Find which address bits are short circuited and report to the hardware designer.
1.2.2. Register Check
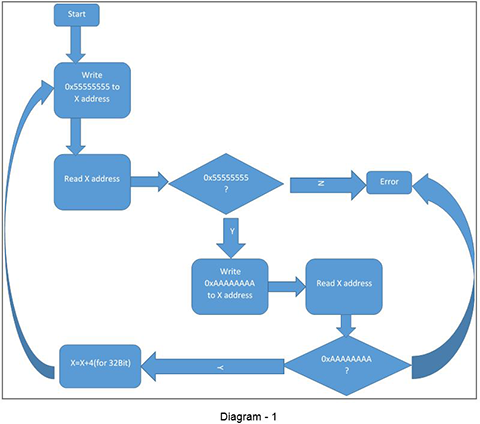
Register check test verifies if the register bits are working properly. This needs to be done for every register as shown in Diagram 1.
First clear all addresses then starting from origin write all registers, 0x55555555 (0x5555 for 16bit, 0x55 for 8 bit) and read it. Check if it is as written. Then write 0xAAAAAAAA (0xAAAA for 16bit, 0xAA for 8 bit) and check it again. If there is a mismatch in a register, check it with another register. If that register has no mismatch or different defect, first register has a defect. Find the defected bit and report to hardware designer with register address.
1.2.3. Data Bus Check
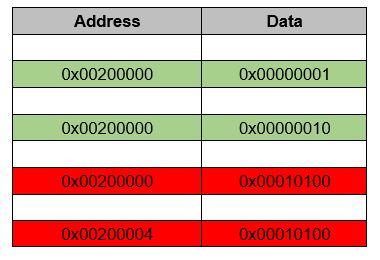
Each data bus bit needs to be checked to eliminate wrong data transmission.
Choose an address and write 0x1 in it. Read it then multiply it with 2. If there is a mismatch, as shown in Table 3, then try the same test with another register. If it has same mismatch then there is a short circuit in data bus.
1.3. Flash
Flash is also a memory space to store data but it has more complex architecture and has slow processing speed. Flash devices are not losing their data if the power is off so mostly they are used for booting codes and store important data.
Flash memories are fast in writing but slow in deleting the data. They are also requires some coding before writing and deleting operations. Mostly they are consist of sectors and those sectors are consist of registers. All registers have addresses and data. Flash register bits are all high if there is no written data in it. Some processors have interfaces for making it easier to communicate with flashes.
Flash is similar to RAM so address bus check, register check, data bus check should be applied to flash memory. Beware that flash may need a specific coding sequence for writing and deleting. Also mostly flashes deletes data, sector by sector instead of register by register.
Flash memories are also needs an interface to communicate with processor. An interface might be needed similar as RAM interface to communicate with flash. Be sure that different chipsets are chosen with RAM or other devices.
Different from RAM, data conservation test should be done for flash memory. After writing some data to flash, turn the power off and on. Verify that flash still has the data in written addresses. Before reading data from flash be sure that interface settings are done.
1.4. Bootloader
Bootloader actually is not a hardware but a software stored internal ROM of the processor. Commonly in first booting process if processor reads a specific data from boot pins (item specific pins), it gives control to bootloader which starts to read data from flash. If flash has right data sequence for bootloader, it starts copying stored data from flash to RAM.
Bootloaders may vary in brands so the algorithm behind the bootloader should be known precisely. Because finding why it is not working is hard and requires very low level coding knowledge.
To test bootloader, 3 different codes or more might be needed. Before start testing make sure that you have a hardware that makes you able to avoid booting process because if device goes into an unknown state after booting you may never comeback from that state due to continual booting process.
One of the codes will be written on flash and booted by bootloader. It should give some output so tester can understand the boot process is completed. After build and compilation done, the output file should be turn into an image or booting data. Most brands supports this process with item specific image generation tools so they should be searched and found.
Second code is the one clears the flash memory. Clearing process might be take a long time due to flash working algorithm. Before writing data to a flash register it must be cleared, otherwise writing process would be unsuccessful.
Third code is the one that writes first code to flash memory. There may be some tools, like flash burners, to achieve this process but also can be done with a written code. Always check the data after writing process is done because if it’s written wrong or a part is missing, bootloader would not work as expected moreover it can take processor into an unknown state.
After first code is written in flash, reboot the device and verify the output created in first code. Remember that if the brand used has some boot options like processor speed, interface clock speed, DDR RAM speed, CRC check, they might be needed to set in an image generation tool. Because bootloaders are firstly executing these kind of settings before copying data to RAM.
2. Environment
Working environment is one of the most important part of testing. Testing equipment are needed according to test. For example; if processors speed needs to be tested, oscilloscope is playing great role. Operating frequency of oscilloscope is the key to make the test reliable and true.
One of the most commonly used device is debugger. It can be connected via debugger port. Debugger is a device that can stop the program in run time and let the operator to see registers on hardware. Also it can run program step by step. Capabilities of debuggers may vary in brands and compilers.
Compiler is also the most important part of the environment. Compiler is a software which builds the codes and turns them into machine language. There are many compilers that works with several languages. Advantages and disadvantages of compiler should be learnt by tester.
Power source might help while testing. The power usage can help find the problem, especially there is a short circuit.
Outputs are important for testing. Because only way to understand if the test is successful, via outputs. According to test, outputs may vary (serial output, discrete output, analog output…). Correct output needs to be chosen for test reliability.
3. Conclusion
To sum up; before start testing, the devices used and equipment for testing should be learnt as detailed as possible to avoid any mistakes. The environment you are testing is also very important for retesting. Because achieving same conditions may be very hard sometimes.
Hardware can have defects but always make sure that written software is correct before modifying hardware. Run more test and try other algorithms or try software on another hardware if you have the option. Check tool and bootloader versions, if exist.