
Authors: Erk EKİN, Rıdvan ÖZKERİM, SW Engineer – Web and Mobile Applications Group

Testing is the most crucial phase among other software development processes. Being a crucial step for delivering high quality applications, it helps software teams to have a relatively different point of view for the product they develop.
This different view is some kind of a simulation of customer satisfaction such that we developers get happy when an escaped bug is found on the way just before the delivery.
Testers are focused on the test cases. They compare the implementation over the actual requirements. However in some cases their role may include to fire up the whole working system from top to toe. Although some testers have a background of CS or CE, this might be like a feared process for them to deal with. They should focus on detecting bugs instead of wasting time for project setup.
In this post we are willing to share methods we followed during the test automation process. The techniques below are applicable to any software. Let’s get break that down a bit.
Motivation
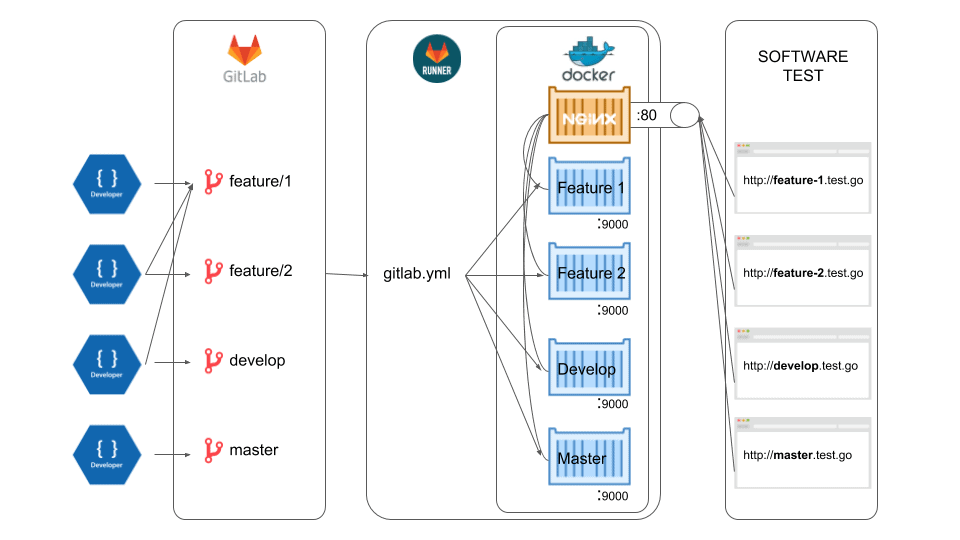
We developers should not spend too much time to get the project up for testing each feature or hotfix. Making the test environment ready should be simple (but not simpler). Every branch should be up for testing just after a push (or commit or check in) to the project repository on the fly. That is why we came up with the idea of simplifying test suite. Below are the steps of our proposal to automate the testing environment.
- Developer is working on a feature branch, say, feature/1234.
- Once developer finishes his work, he pushes the code to the server.
- Gitlab searches for gitlab.yml file in the root directory.
- If found, it follows the directives and run codes in runner machine.
- Once the project is built successfully it wakes up in a new subdomain like: https://feature-1234.test.path.com/
- Tester can access the working feature by clicking the environment link through Gitlab Environments page. Unless you use Gitlab Environments, you can ignore this step. Tester needs just a browser to test feature commit.
- Profit!
We apply git flow methodology to our project. It means each developer works on a new feature and each feature should be reviewed and tested before merging into develop branch. To get detailed information about the git flow you can head over to the Github page. [1] In our team there is more developers than testers, as usual. Assuming each developer has 2 commits per day, it is tough for them to stop current branch, pull new branch, run project again and if there are inconsistent states from previous tests, fix them. We knew, we can automate this process by using docker, thus, rolled up our sleeves.
Material and method
We applied a set of methods to enable developers push the changes to the server, and let it set entire test suite up, out of developer’s personal machine. That server is called runner (a.k.a agents, in Jenkins) in this post because we use Gitlab and Gitlab ecosystem in the company. Runners checkout the repository and build.
To setup Gitlab CI environment you should have master privileges on the project you are working on. In case you lack of experience on Gitlab CI, please refer to Google and have a quick background. You should at least have an idea on how to set up Gitlab runner servers.
Next up, let’s define what runner will do after a push to the repository. We need a .gitlab-ci.yml file placed in the root of the repository and add definitions of how the project should be built. [2]
Last but not least, we need a reverse proxy web server to redirect incoming http requests to the related docker container dynamically. Outer world can only reach our containers over nginx because we did not forward port 9000 for security reasons and besides we don’t want to reserve a new port for each container. Here is the nginx .conf file to do so.
What is Docker and how docker helps us?
Since we want a testing environment supporting multiple branches at a time, we needed Docker installed in the Gitlab Runner machine.
Docker is a containerization platform which aims to simplify the problems of environment standardization so the deployment of applications can also be standardized. For developers, Docker allows you to simulate production environments on local machines by running application components in local containers. [3]
We need a Docker image that is going to be used as a template for containers. For our Play Framework with angularjs project we need node, npm, gulp, bower, sbt, mysql and redis installed on top of ubuntu in the same machine. Due to time constraints we decided to adopt a monolithic construction here by putting all together in the same container. Each container should run the project independent of each other with their dedicated database (mysql), so all containers should have these programs installed.
To create Docker image containing all dependencies to fire the project up, we combined two methods. First we used a Dockerfile to do the heavy lifting, that is, downloading and installing dependent apps and middleware, or whatever our app depends on, second, we hand-crafted the suite with Docker commit. What I mean by hand-crafting is to resolve and download SBT dependencies in ivy cache directory so that it will not download these time consuming data for each run on a new container.
- Caution! You should make sure the project runs seamlessly in the container. Otherwise, inevitably, you will keep tracing terminal windows in pain.After achieving the appropriate Docker image we pushed it into Docker Hub, the native registry of Docker images storing both public and private repositories.[4] should be careful not to include any private files or folders related to the project before pushing the image to the cloud. Because the image will be public when you send it to Docker Hub. Tough, there is a premium option to keep it private.We sent the image to the Docker Hub in order to keep it safe and not to lead any loss of efforts. Hence if you make sure you will keep your image safe, then you don’t have to push your image. But bear in mind, when you’d like to clone the runner server, a line at top of a Dockerfile like FROM you/the_image_you_created_in_1000_hours, will save life.Continuous Integration with Gitlab EnvironmentWe use 9.1.0 version of Gitlab Community Edition and it ensures continuous integration features. [5] We need to install Gitlab Runner on our runner machine. [6] With an Gitlab account has least master privileges on the project the registration token for new gitlab runners can be seen. By using this token we registered the machine as Gitlab runner to our internal Gitlab server. After these steps, we can manage continuous integration process by adding and modifying “.gitlab-ci.yml” file placed in the root directory of the repository. With Gitlab CI we can define and automate test, build and deploy stages with multiple jobs, but because our Gitlab version does not support artifacts and services yet we combined the stages in a single job.Defining deployment job
We need to add deployment to stages:
stages:
– deploy
Now, we can define our job will be executed in deploy stage
deploy branch:
stage: deploy
And then, we can write our scripts for this job:
script:
– “cd ui”
– “npm install”
– “bower install –allow-root”
– “gulp –release”
– “cd ..”
– “activator dist”
– “docker stop docker-$CI_COMMIT_REF_SLUG || true && docker rm -f docker-$CI_COMMIT_REF_SLUG || true”
– “screen -dm docker run –name docker-$CI_COMMIT_REF_SLUG –hostname docker-$CI_COMMIT_REF_SLUG –network XNETWORK -v `pwd`:`pwd` -w `pwd` –expose=9000 –expose=3306 -itd ubuntu-sbt-node-mysql-redis-ivy bash gitlab_deploy_feature.sh”
– “sleep 5”
– “docker restart nginxr”
We have angularjs project in ui folder at our project structure. So, we enter it and make release after installing bower and node dependencies. Then we take release for our sbt project by using activator. We can take branch name by using Gitlab CI variable $CI_COMMIT_REF_SLUG. [7]
If there a docker build for the same branch already exists, stop and remove it.
– “docker stop docker-$CI_COMMIT_REF_SLUG || true && docker rm -f docker-$CI_COMMIT_REF_SLUG || true”
Now, we have a clean environment to build up our new docker container.
This yaml file is self-explanatory enough. But we want to highlight some key parts of it.
–network XNETWORK
By stating the network explicitly, we ensure, the related container will be able to communicate with nginx container. To create a bridged network, we simply run this command before running any of the containers. XNETWORK is replaceable.
$ docker network create -d bridge XNETWORK
–network XNETWORK argument basically adds the container into a previously defined network called XNETWORK.
$CI_COMMIT_REF_SLUG
As you see we used this variable everywhere in yaml file. We did so because we wanted to get benefit from the Gitlab’s environment variables. This one provides git commit reference slug that we can use it as the subdomain, docker container hostname and screen name. For more variables please refer to here.
“docker restart nginxr”
We noticed that nginx container should be restarted once a new container borns into the network. If you have any idea why, please add it the comments below.
before_script:# Log distro info
– cat /etc/*-release
# Log the java version
– java -version
# Log the nodejs version
– node –version
– npm –version
# Log the bower version
– bower –version
# Log the gulp version
– gulp -v
stages:
– deploy
deploy branch:
stage: deploy
script:
– “pwd”
– “cd ui”
– “npm install”
– “bower install –allow-root”
– “gulp –test”
– “cd ..”
– “activator dist”
– “docker stop docker-$CI_COMMIT_REF_SLUG || true && docker rm -f docker-$CI_COMMIT_REF_SLUG || true”
– “screen -dm docker run –name docker-$CI_COMMIT_REF_SLUG –hostname docker-$CI_COMMIT_REF_SLUG –network XNETWORK -v `pwd`:`pwd` -w `pwd` –expose=9000 –expose=3306 -itd ubuntu-sbt-node-mysql-redis-ivy bash gitlab_deploy_feature.sh”
– “sleep 5”
– “docker restart nginxr”
environment:
name: $CI_COMMIT_REF_NAME
url: http://$CI_COMMIT_REF_SLUG.test.go
on_stop: undeploy branch
only:
– branches
undeploy branch:
stage: deploy
script:
– “docker stop docker-$CI_COMMIT_REF_SLUG || true && docker rm -f docker-$CI_COMMIT_REF_SLUG || true”
only:
– branches
when: manual
environment:
name: $CI_COMMIT_REF_NAME
url: http://$CI_COMMIT_REF_SLUG.test.go
action: stop
We put nginx.conf file contents
events {
}
http {
   server {
      listen 80;
      server_name ~(.*).test.go;
      location / {
              if ($host ~* ^([a-zA-Z0-9-]+)\.test\.go$) {
                    set $proxyhost docker-$1:9000;
                 }
                  resolver 127.0.0.11 ipv6=off;
                 proxy_pass http://$proxyhost;

                 proxy_http_version 1.1;
                 proxy_set_header Upgrade $http_upgrade;
                 proxy_set_header X-Forwarded-For $remote_addr;
                 proxy_set_header X-Real-IP $remote_addr;
                 proxy_set_header Host $host;
              }
         }
     }
Future work
We put all dependent application into a single docker container for each branch. But that would be better if we had separated them into different containers. Docker compose could be used to orchestrate those containers and would provide a much more flexible and debug friendly environment.
References:
1.) https://datasift.github.io/gitflow/IntroducingGitFlow.html
2.) https://docs.gitlab.com/ce/ci/yaml/
3.) https://www.digitalocean.com/community/tutorials/how-to-configure-a-continuous-integration-testing-environment-with-docker-and-docker-compose-on-ubuntu-14-04
4.) https://docs.docker.com/docker-cloud/builds/push-images/
5.) https://about.gitlab.com/features/gitlab-ci-cd/
6.) https://docs.gitlab.com/runner/install/
7.) https://docs.gitlab.com/ee/ci/variables/